SOCIAL MEDIA

Showing posts with label homemaking. Show all posts


If you take a trip through the blog archives, I originally shared my DIY Laundry Powder recipe in 2018. I got away from making my own in the last few years, but after a bad reaction to traditional laundry soap I decided to get back to it! This is such a budget friendly solution to the rising prices in the grocery store. 

My recipe has evolved a little bit, so I thought I'd share the updated version!

This recipe is to fill my 2 gallon glass jar, which is enough detergent to last about a year.
Mix the following together:
1 - 4lb Box Borax
1 3.7lb box Washing Soda
2 Bars Grated Fels-Naptha OR 1 17oz Box Zote Flakes
2lbs Epsom Salts (Optional)
1 3lb Tub Oxiclean (Optional)
Scent Booster (Optional)

Use 1-2 Tablespoons per load

Tips:
- This is much easier to make if you put all the ingredients into a trash bag to mix, instead of trying to use a spoon. 

- I have a HE high capacity washer without an agitator. I use 2 tablespoons per load because I can fit a lot in one load. For smaller loads of just a few things I use 1 tablespoon. If you have a smaller capacity washer 1 tablespoon should suffice.

- Keep in mind that the Oxiclean is optional. The rest of the ingredients will still get your clothes clean, but I like the boost in whitening.
 
- The scent is also optional. Without it, your clothes will just smell clean. Not including the scent will make this ideal for people with fragrance sensitivity. I got a trial size scent booster and that does it for me.

- There some mixed opinions on including epsom salt. It's said to have softening abilities, but some might choose to omit depending on their water hardness. You can also use plain white vinegar as a softener. Epsom salt hold onto scent well too, so you can add a few drops of essential oils to your salts for an added scent. 


And, because sharing is caring, I now offer my Laundry Soap vinyl decal over on Etsy! I love this font, because it's like my handwriting - but better. Blog readers get a discount when they use the code: kristenwoolseyblog at checkout!

Shop This Post:


-Kristen

This post contains affiliate and referral links! | Blog Disclosure

Updated DIY Laundry Detergent Recipe

Monday, June 23, 2025

Just so excited to share our recent closest organization project! We have a really nice sized closet, but it lacks organization systems - there is just one rack all the way around. That's more that enough room for our hanging clothes, but not so great when it comes to folded clothing. In our old house we had a great closet system with lots of drawers and shelves, so we got by with just one dresser outside of the closet. 

I've been wanting to create a better system since we moved in 3 years ago, but honestly didn't want to spend the money. Closet systems are pricey and so is decent furniture! Even after casually searching Facebook Marketplace, I didn't really find anything ideal.

Well, things fell nicely into place for us and we now have 3 new to us dressers that totally transformed the way we organize our clothing. A friend had 3 older dressers that were solid wood, and in great shape. They needed a little TLC, and I had to decide if we were going to sand and stain or go with paint. 

Ultimately, I went with paint for ease! I fell in love with this shade of blue green called Balsam Fir, and did a matte black paint for the brass. 


A couple of before shots: 


Additionally, we bought a back of the door shoe organizer which really helped with floor space. Now instead of sharing a single dresser, we have 3! We each have our own and then share the third. I'm loving it, and it's inspired me to keep it looking great! I'm thrilled to have this project done after so long. We spent like $80 on paint and supplies (like a giant tarp because it's rained for 100 years straight here and I had to do 2 of the dressers in our tiny living room) which is so satisfying because buying 3 dressers new would have cost a pretty penny. 
-Kristen

This post contains affiliate and referral links! | Blog Disclosure

Closet Project

Monday, July 8, 2024

I don't know anyone blessed with more pantry space than my mom! They have a huge pantry, and it even keeps going with a 'small' alcove under the stairs. Considering we grew up with a little cabinet for food and snacks - this is a major upgrade for them! On top of all that space, my mom is a big fan of Costco/Sam's Club bulk shopping. So, this little room has gotten out of control in the last 2 years they've lived in this house. 

Now, if you know me at all - you know I absolutely love a good before and after organization project. But, I try not to push my own life style and opinions on the ones I love. You get more flies with honey they say. So while this space was calling my name for a good long while, I waited until my mom asked for some help. Then I took over! 

The main problem we were facing was too much space. There are so many shelves, it was just easy to throw anything anywhere. We needed some corralling. Then we were able to group like things together and make it make sense. 

Additionally, my nephews (her grandkids) used the alcove space for their toys. It's actually a perfect spot to hide them, but it sort of made this spot a catch all. I brought over a cube unit (that I no longer needed because of this post) to help sort all of that. Plus, we purged a lot of their 'baby' toys, since they are big kids now. 

Without further ado, here's the before and after! Scroll down to see the products we used and loved.

Before:


After: 


I'm a huge fan of the Home Edit line at Walmart! I did my own pantry and laundry space with these clear acrylic bins and I find them so versatile. (This mega set is such a good price!) Now, you know, I wanted to label the heck out of these bins. After all, I have an Etsy store dedicated to labeling...but I know my mom and I know this space needed to stay flexible. The cool thing about the acrylic bins is that you can use a chalk marker to label them and then change it up when you are ready. 

But, if you are a labeler - like me! - I've got you covered over on Etsy! Because you are a blog reader, I'd love to offer you a 15% discount on your purchase! In my Etsy shop I have a variety of vinyl decals, home décor and custom gifts! I'd love to create something with you. 
USE CODE:  KRISTENWOOLSEYBLOG for your discount! 

Products We Used:


-Kristen

This post contains affiliate and referral links! | Blog Disclosure

Pantry Organization Inspiration

Monday, July 24, 2023


It's been years since I first started my decluttering journey. Getting started is hard, but once you get on a roll it's so incredibly satisfying to declutter! Moving twice in the last few years helped too. But as you know, clutter creeps back in. Every once in awhile it's good to do a quick pass through the house to keep it up. Admittedly, I let a few spaces get really cluttered recently, and I am so ready to fix the problem! 

(This is a really satisfying post if you like this kind of thing! I did the Emily Ley 30 day challenge and got rid of so much!)

Kitchen Desk

We have a small desk/console style table in the kitchen that we use as a bar, and a handy place to store dog treats. Unfortunately, the drawers tend to be a quick place to shove those random items you don't know what to do with. So, I'm taking 5 minutes to straighten this up! 


Bedroom Table

We have another desk style table in our bedroom under the television. It also accumulates so much! Most of the time, it's because we are too lazy to put things in their real homes. This took another 5ish minutes to fix and I felt instantly better. 


Office Closet

Blake and I are loving our new joint home office set up! This bedroom has 2 small closets. One for me, and one for him. My closet stores some Etsy supplies like shipping boxes, and other crafting/hobby items. This spot hasn't been working for awhile, so I am just SO happy to be taking care of it. I purchased a new hanging organizer from Target along with some matching lidded bins

I could not be happier with the results! This is a really good before and after. 


Shop This Post:

-Kristen

This post contains affiliate and referral links! | Blog Disclosure

Declutter with Me

Monday, July 3, 2023

Just wanted to share another fun house update! We had the whole house painted recently, and we decided to take advantage of taking everything down. If you are going to go through all the effort of putting things back up, you may as well fix old issues along the way. One of those issues was our gallery wall. It was neatly (and meticulously) measured out before, but we didn't love the angle of all the photos - so since we had to re-hang them, we fixed the decent of the frames and love the outcome.

Additionally, since we were just painting everything bright white, I wanted to add something fun to the area. I found some pretty cool stair riser wallpaper strips on Amazon and we love how they look. 10/10 on the look, but these were an absolute nightmare to install. Don't zoom in too closely, or you'll see all the imperfections. Regardless, we love the look and hopefully these removable strips stay up for a decent amount of time. I really think it would have been easier just to make a stencil and paint the risers, but lesson learned. 


Just a reminder of the space 'before'...


-Kristen

This post contains affiliate and referral links! | Blog Disclosure

Wallpapering Our Stairs

Friday, December 23, 2022

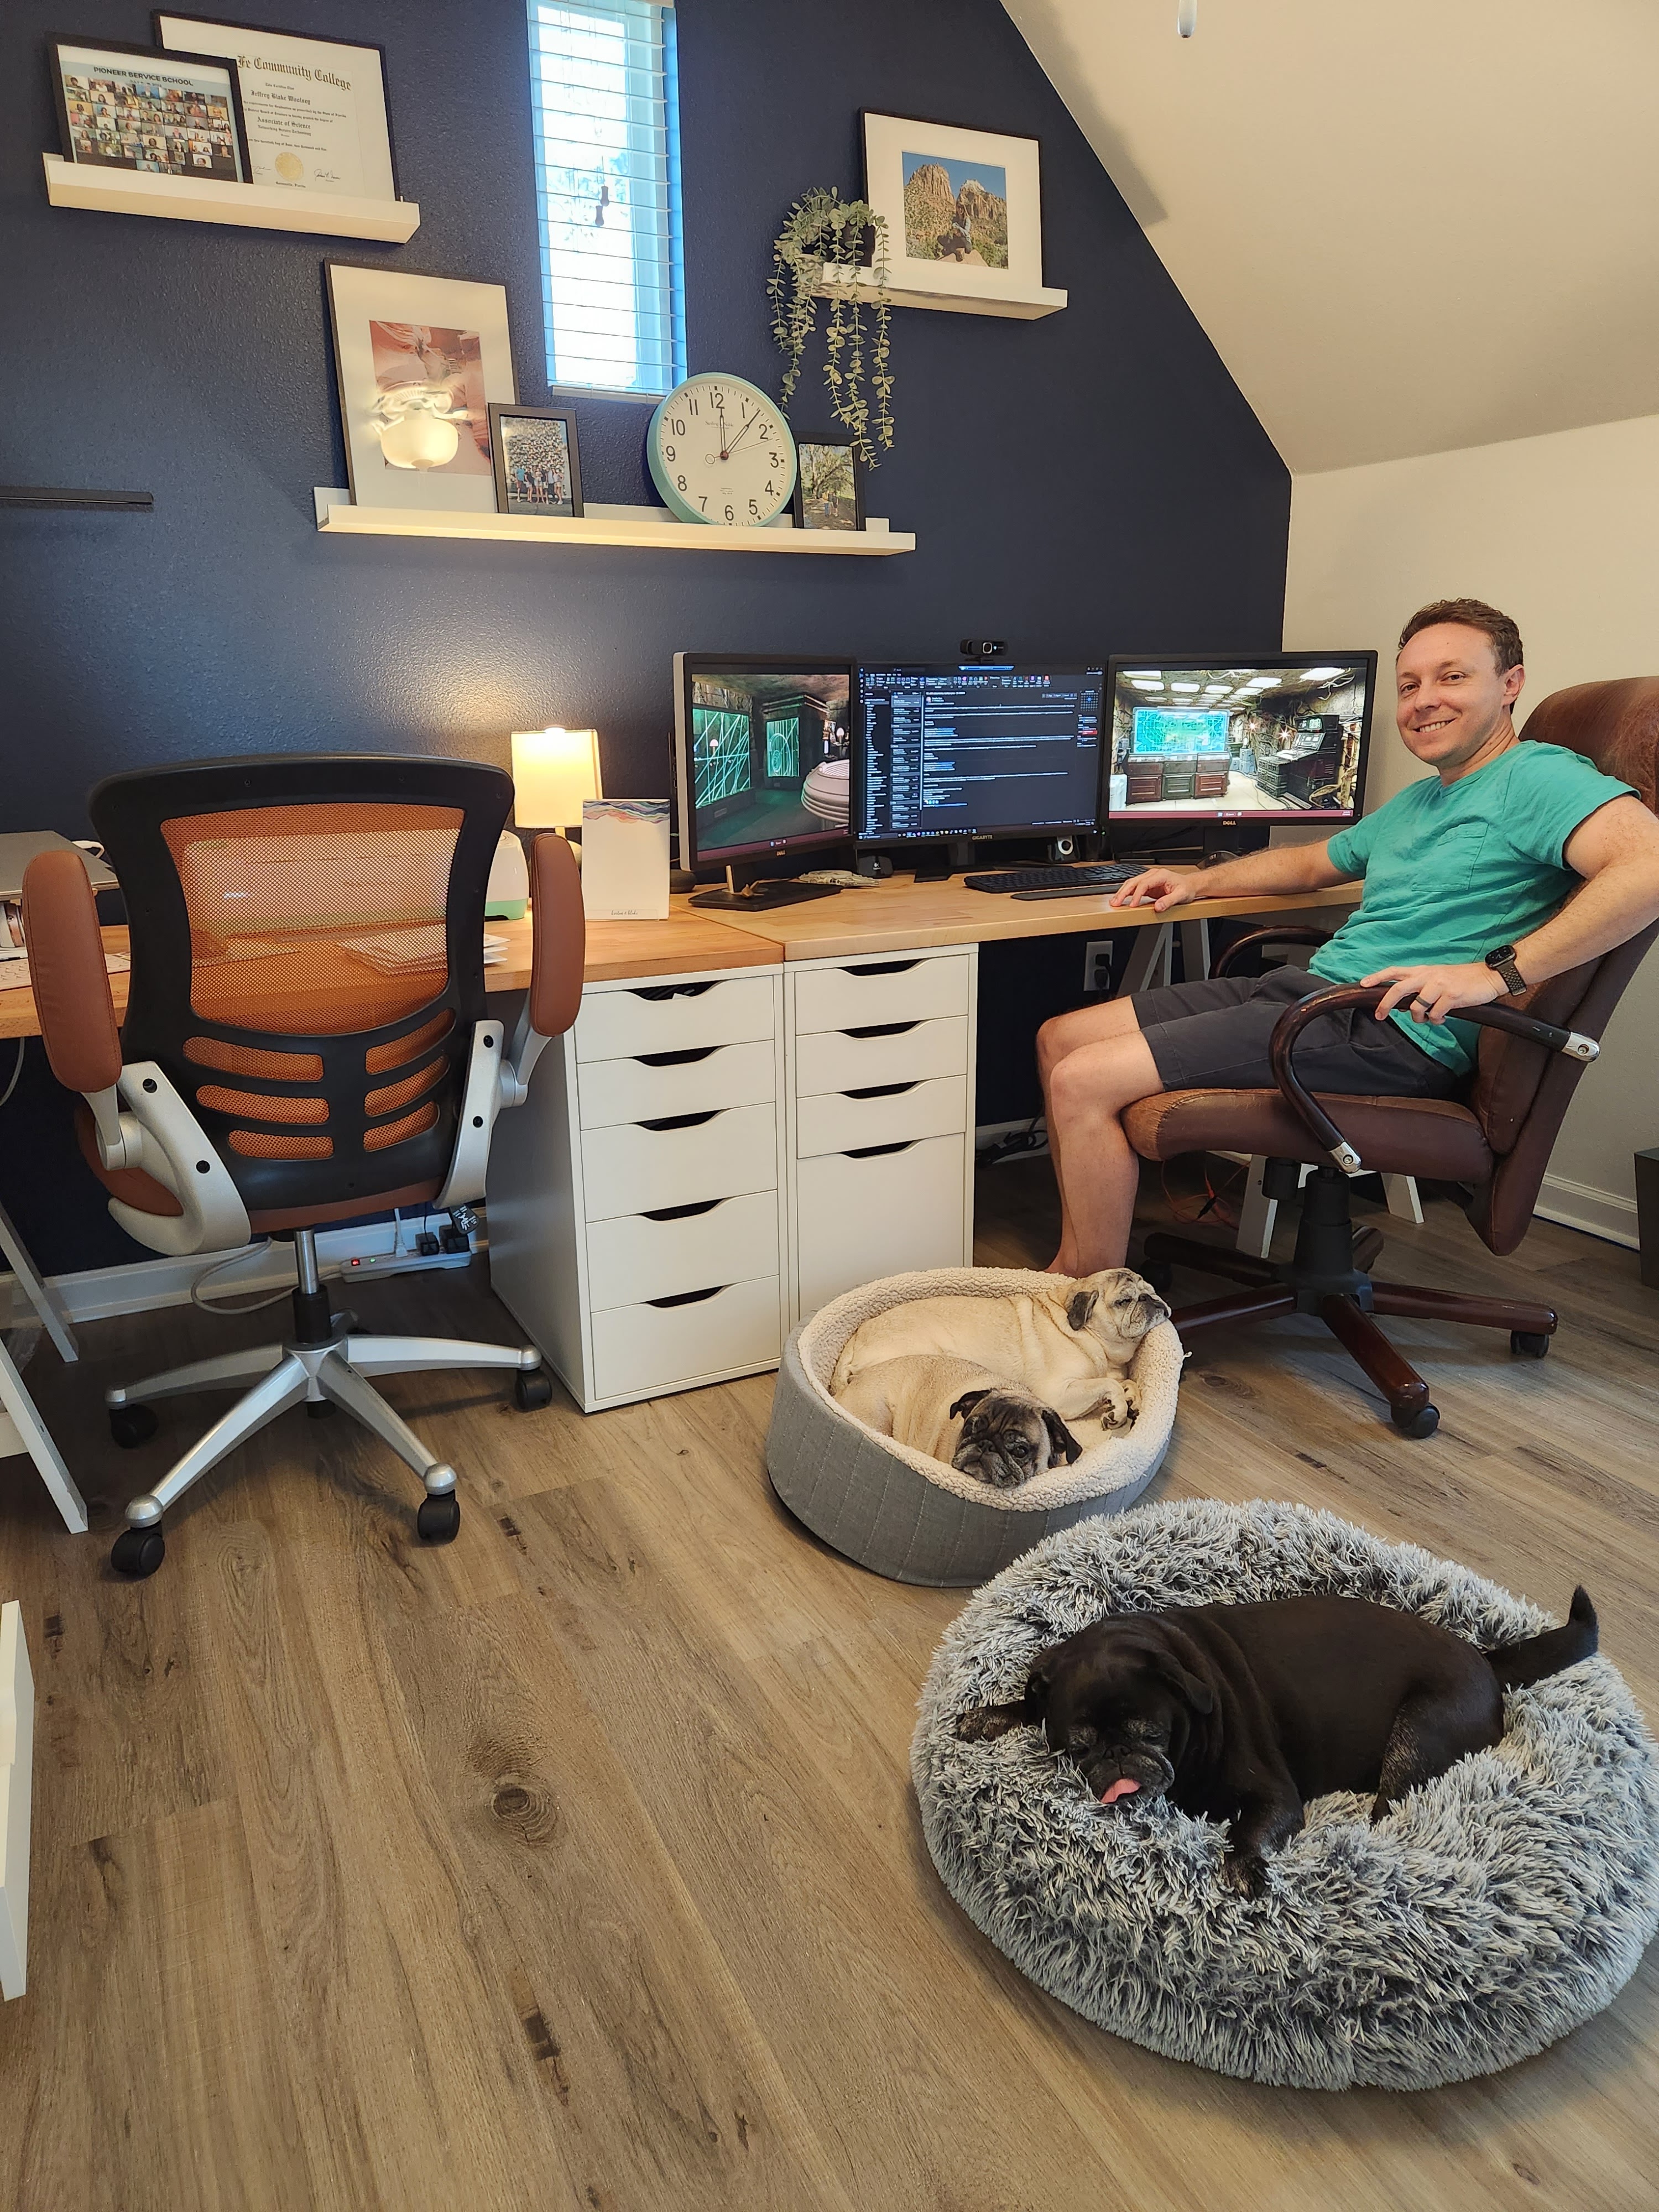
When we first moved into our home, Blake and I split up our home work spaces. I had a desk in our guest room, and then he had the second upstairs bedroom for his desk and all our workout equipment. I'll make this long story short, but we had some friends staying with us for a semi-lengthy amount of time a few weeks ago. Because I wanted them to have the guest room to themselves, I pulled all my stuff out and set up a temporary space in Blake's office. 

I had been quietly discontent with my office space for awhile. With Etsy, and all that comes with running a small shop, my desk was just not cutting it anymore. I was constantly running out of room and would just use the guest bed as a secondary workspace. Once we were working in one room again, we both admitted we liked it better that way. But, that bedroom is much smaller than our guest room so it was cramped. Anyway...I said I'd make a long story short, but I can't! Haha. Basically we decided to keep a joint office but switch the bedrooms to be most efficient. 

Just to remind you what we were working with, you can see what this room looked like in this post


It took some planning, but we came up with a great concept using this image as the inspo. I wanted one really long desk. Blake already had one that we loved from Ikea. The problem was, Ikea doesn't sell the butcher block topper anymore. But, if I could find something similar, all we would need is one more set of the Alex drawers. Low and behold, I found an almost identical piece of butcher block already cut to the perfect size on Lowes.com! It wasn't exactly cheap, but the quality is insane and it's incredibly smooth. The two table tops are slightly different shades at the moment because I oiled up our original one so it's quite dark. That will fade and I think they will be a really close match. 

So one quick trip over to Ikea, and I got our missing base piece. Plus, a few fun décor items like these wall shelves! I always felt that this wall was strange because it's got the roof line to deal with and the world's tiniest window. I really feel that the shelves help it make sense! We had the room painted as well, and I could not love the navy wall more! We went with Sherwin Williams Naval

As soon as we got the desk set up, I knew it was the best decision ever. And then, when I fulfilled my first Etsy order sitting at it, I was thrilled! It's just so much more functional and I love having twice the desk space to work on. And twice the drawer space too! I really need to sit down and organize those but, that's a project for another day.


The other side of the room is still in progress. The alcove I had my desk in is perfect for our exercise bike and all our free weights. But we still need to install a TV, and maybe figure out a way to organize our equipment better. Stay tuned for that! Plus, up next will be our new guest room reveal! I'm very excited to have this space set up for friends and family to stay in and I think it will be so much more functional. 

Shop this post:


-Kristen

This post contains affiliate and referral links! | Blog Disclosure

Joint Home Office Update

Monday, December 12, 2022

Guest Room
Preparing for a weekend this summer when we were going to have back to back guests in a single weekend, I realized that I was not prepared on the linen front! The guest room was ready to go, but the extra sheets I had for our air mattress were despicable. I grabbed some fresh sheets from Target, and fell in love with this pale green quilt while I was there. I still love the colorful Vera Bradley quilt set I originally bought for this room, but thought I'd use the green set as we go into fall and winter. 


Office
My office space is in our guest room, and I am up here just about every day fulfilling Etsy orders. This space has been one giant experiment since we moved in last summer. I finally feel like I've got it mostly right! It took some reorganizing and purging, but ultimately I got everything I need to run my shop in this corner and just a few shipping supplies in one of the closets. 

Function is so important to me, so feeling like everything is in a good spot has been really nice and inspirational! 

The decluttering and reorganizing was so fulfilling too! Blake and I both ended up with 3 large boxes full to take to Goodwill and the electronic recycling center between our two office spaces. 

Bedroom
Our bedroom is such a relaxing space. When we moved in, I attempted to get away without bedside tables. (Our former side tables are now upstairs in the guest room) Eventually, we both agreed we wanted some. So I found tables that matched the desk we are using in our room as a console table. I really like the tables themselves, but what I've really been enjoying is keeping them completely cleared off. I love the minimal feel of that. 

I keep daydreaming about doing some hanging pendant lighting, or some kind of wall mounted bedside lights, but for now we will keep the floor lamp. You know I'm a super legit blogger when I didn't even fluff the pillow for this photo. 

You know, I never did a full room tour of this space. Is that something you'd like to see?


Upstairs Landing
Super random, but I added this little water bowl for the pugs upstairs. Delly and Winston follow me (well Delly likes to be carried) upstairs for work, so I felt bad that their water was so far away downstairs. I really like this bowl and next time I go to Target I'm going to see if they having matching food dishes. *Fun fact, I always get the pugs cat bowls instead of bowls geared toward dogs. They have such short faces, I find that cat dishes are much better for them. 

This mat is really helpful with the drips from water bowls too!


Kitchen
Just a little note on the kitchen: I recently removed everything from the kitchen island, except for the essentials at the sink. I really love how this looks and feels. I have some décor up above the cabinets, and the other counters are full of small appliances and our knife block - so having this space cleaned off really helps make the kitchen feel cleaner. 

I also LOVE the soap dispensers I got in my last Grove Co. order! Such a pretty touch that I love to see out every day. 

You can see the full kitchen tour here! <however that was before we did the backsplash! You can see the backsplash in this post!


Another current kitchen favorite! My two favorite essential oil blends right now from Revive. Gosh could I go on about how much I love Pumpkin Pie! But, Root Beer is a new one to me. It smells exactly like a root beer dumdum lollypop and makes your house smell like a candy store. In the best way. Love it so much! 


Living Room
Ok, super random, but! We rotated the area rug in here and it changed everything! It's something that bothered me when we moved in, but I got used to it and ignored it - but I always felt like we should have put the rug the other way. I don't know how, but I convinced Blake to lift up furniture for me as I flipped it and I'm so glad we did. 

Not only did it balance the room better, but I think it helped relieve the rug from getting worn out in all the same places. 


P.S. The pugs are clearly still LOVING their new beds

Shop this Post:

-Kristen

This post contains affiliate and referral links! | Blog Disclosure


Around the House

Tuesday, August 30, 2022

Since moving into our new home last August, we've had to do very little! That's such a change for us, because the home we owned for a decade was SUCH a money pit when it came to updates and maintenance. That's the difference between a house built in the 1950s and one that's just a year old. It's been a blessing for sure. We did put in a backsplash, but that's about it! 

One thing though that we did want to eventually do is our boardwalk. We live in a row house, so we park in the back and use a boardwalk to the side door. (Our front door faces greenspace.) This boardwalk was pretty basic, but it really bothered us that it didn't have railings. So we had a contractor build a great railing and some privacy slats, and then this weekend we were able to stain it finally! 

Here's what we were working with:


And here's what we were able to do:


We only have a small flower bed, and no yard to speak of. Which has been such a treat! Our old house was high maintenance with almost an acre of daunting yard work, so this is bliss! I did miss a little bit of it though, so I'm thrilled to have found these flower boxes to add a little life into our place. They were easy to put together and I might add another down the line for some herbs. 

The color of stain is just right too! It matches our front door and another accent on the house perfectly. Plus it had a sealer built in, so it will really keep the deck nice! We also added a few solar lights to the railing, and that's been such a nice touch at night. 

The side door was so plain, so I just had to add some vinyl! I loved this design so much, I added it to my Etsy shop. I hope it will help the door more look more inviting to our guests. It is a little bit weird that our front door isn't the main door we use, I've never lived in a house like that before.

I originally bought a wreath for the side door, and ended up loving it on the front door, so I had to buy a second one. 😂


In addition to the boardwalk project, we were able to get some scrubbing done - and I officially feel like I got my spring cleaning checked off the list!

Shop This Post:


-Kristen

This post contains affiliate and referral links! | Blog Disclosure

A Weekend Project | Our Boardwalk

Monday, May 23, 2022


Hello!

Hi friends! I'm Kristen, and this is the Life and Style of a mid 30's Floridian living the Best Life Ever, with her husband and two pugs. Runner | Avid Reader | Small Shop Owner