SOCIAL MEDIA

Showing posts with label photography. Show all posts
My sweet little 6 year old Lennox just graduated Kindergarten! He's a silly, yet pretty quiet, handsome smarty pants whom my family just adores. Because he's reserved around strangers, my sister asked me if I could whip out my camera to take a few photos of him for this milestone. I love to take pictures, but it's not been one of my main hobbies - and honestly I feel kinda rusty behind the camera. Probably the last time I did any official portraits were for my brother's college graduation. 

I'm so pleased with how his portraits turned out! He was definitely more comfortable with me behind the lens, and I feel like his personality really shined during this photo shoot. We took some with a tiny cap and gown! 😂 It was cute, Lennox had some ideas for poses that we indulged to keep him enthused with the whole process. 

I'll just share a few of my favorites, but my sister and I both agreed we got at least 30 solid photos. Which felt like a huge victory taking pictures between rain drops and considering the attention span of a 6 year old goof ball. 


-Kristen

This post contains affiliate and referral links! | Blog Disclosure

Lennox's Kindergarten Graduation Portraits

Monday, June 3, 2024

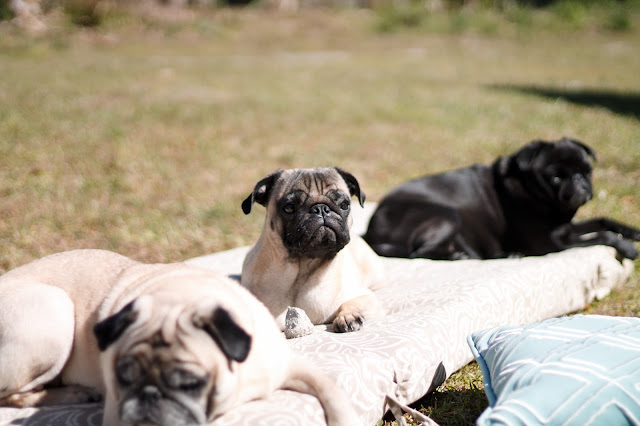
I'm just tickled to have a new lens for my camera! I've always said that it's all about your tools. You can do anything if you have the right tool or equipment for the job. My favorite thing to take photos of are people, products, and my pugs. So a lens that goes down to 1.8 is SO exciting for me to use. I've been playing around with it, but when I saw my pugs lounging around in the backyard I knew I needed to bust it out. 

I was cleaning and rearranging stuff in the backyard, and had thrown my lounge chair cushion out into the grass to get it out of my way. The pugs obviously took the invitation and started sunning themselves. Such a typical pug thing, they really seek out soft things to lay on. 

Pug Portraits // Pugs & Pearls Blog

Pug Portraits // Pugs & Pearls Blog

Pug Portraits // Pugs & Pearls Blog

Pug Portraits // Pugs & Pearls Blog

Pug Portraits // Pugs & Pearls Blog

Pug Portraits // Pugs & Pearls Blog

Pug Portraits // Pugs & Pearls Blog

Pug Portraits // Pugs & Pearls Blog

Pug Portraits // Pugs & Pearls Blog

Pug Portraits // Pugs & Pearls Blog


This last shot shows how much practice I need with focusing, but I thought it was still a cool picture! Check out that bug! (Gross, but still cool to me.) 

Can't wait to use this thing some more and get better at it! Leave a comment below if you think your pets are the perfect models for pictures! And anybody with photography experience should leave their best tips for us beginners! 

Puggy Photo Shoot

Thursday, March 22, 2018

Three Tips for Amazing Blog Outfit Photos!

Find A Photographer
While it is completely possible to take your own photos with a tripod, it's not the most ideal arrangement. I've done it, it's not great. Constantly running back and forth to the camera, making sure you are lined up correctly, setting the timer and running back to your mark is so inefficient. Plus it can feel really awkward smiling at nobody! 

Hire your husband, sister, mom or best friend for an hour! Promise them you'll buy their lunch, and go have some fun. My poor husband does not enjoy taking outfit pictures for me. He has always done a great job though! (You can see his photos here and here!) 

I can't recommend enough hiring a professional! This is a great opportunity for you to find a local photographer, one who may just be starting out. They will appreciate the practice, and will have some great portraits to add to their portfolio. Plus, newer photographers tend to be more affordable. (And may even be open to trading some social media exposure for pictures!) 

You can always hire a more established photographer, and in that case you will probably end up with perfect and stunning images to use. (Great exposure for you if they share your post with their followers too!) With that may come a bigger price tag, so it's all in what you can budget. 

Three Tips for Amazing Blog Outfit Photos!

Three Tips for Amazing Blog Outfit Photos!
Original Posts: Top // Bottom

Communicate With Your Photographer
Miscommunication may be the biggest source of disappointment there is, in general. Both you and your photographer need to be on the same page, and the best way to do that is to talk about exactly what you want. 

If your photographer is an inexperienced friend, try taking a photo of them in the same pose you want them to take of you. They will be able to clearly see what your vision is, and they can easily replicate what you want. 

Professional photographers all have a different style. Some take dark and moody pictures, while others prefer bright and airy shots. Some love to pose you in a very Pinterest way, and still others want to capture you candidly. Which do you like better? Tell them! It's also important to communicate exactly what shots you are hoping to get. If you are showcasing your new handbag in your next post, make sure they know you need a shot of it. 

Communication is also important when it comes to the business side of things. Ask questions. When do they expect payment? How long does it take to get back your images? How much photoshopping do you do? Do I need to credit you for the photography in my post? How often can you work with me? Is it okay if our next shoot is several outfits? And if it's a friend or family member taking the pictures, make sure you ask if they mind doing it or if they don't enjoy it! That's important. 

Three Tips for Amazing Blog Outfit Photos!

Three Tips for Amazing Blog Outfit Photos!
Original Posts: Top // Bottom
Tips for Posing
If you've hired a professional, they may be able to warn you if your stance is unflattering. But, if your mom is taking the pictures, she may not recognize an unflattering angle-because let's face it, your mom always thinks you look beautiful. In that case, have her take a few and then review the back of the camera. See what you like, or don't and adjust!

Practicing in front of the mirror is always a good idea. Get fully dressed and do a few poses in front of your reflection before you head out for your photoshoot. Most likely you already know what your best angle is! 

Generally speaking, it's best to lean your weight away from the camera. This is a tip I picked up from my photographer! Naturally I always try to lean in, but I can tell when my weight is shifted away. It may feel a bit awkward, but it looks much better! 

Give your photographer something to work with too! Laugh, play with your hair, or smell a flower. Not only is this more interesting to look at as a reader, but it makes the whole photoshoot more fun. Just standing there doesn't give your photographer much inspiration. & When they do have a flash of inspiration, go with it! It'll be more exciting for both of you. 

Leave a comment below with your best blog photog tips! Do you do it yourself, or have you found a trusty professional? Shout out to all those Instagram husbands out there!

My Three Top Tips For Amazing Outfit Photos

Monday, February 12, 2018

My photography experience is basically limited to this blog. (I did do one of my best friends a favor and take her family pictures a few years ago.) But, my mom asked me to take a few pictures of Cameron for his graduation announcement and party. 

I have never been more nervous! I can't imagine if it had been a paying customer. I'd be dead! Posing guys could not be more difficult. My research ahead of time for locations and ideas only had girls as the subjects. Beautiful pictures, but my brother can't lie down on a fountain and look quite the same... Honestly, girls look good just standing there. Guys look pretty goofy. 

To make matters more stressful, I asked Cameron if he had any ideas that he'd like to try. He had a great list of locations, but then he showed me a photoshoot one of his classmates had just posted. These pictures were STUNNING. I knew I couldn't do that. I tried to be confident, but I had to tell him to lower his expectations a bit. 

One more stressor was that we weren't the only ones on campus trying to get our photos done. The first location we tried had a LINE of people and their photographers waiting to stand in front of the famous fountain. Whole sororities were out taking pictures with their graduates. That's what we get for doing this a week ahead of time I guess. 

The next location was vacant, and we took our time there. But I knew we wanted some shots in more iconic FSU places, so we wound up standing in one of those lines. I was pretty self conscious, even though I wasn't the one in the big tent of a gown! There were actual professional photographers in front of and behind us. People who legitimately knew what they were doing and how to direct their subjects...haha! 

It was all in my head. I made friends with the photographer ahead of me, and realized everyone was really relaxed about these lines of people. In fact, no one seemed to be paying attention to any of the other groups. Everyone was just drinking their 'prop' champagne with their friends. I was able to relax a bit after that, but I wasn't fully relieved until I was able to get on the computer and make sure my lens cap wasn't on the whole time or something! 

We got a few really nice shots, so I thought I'd share. Especially if you plan on taking any pictures like this, or need inspiration for how to pose guys!


Okay, so I wasn't really sobbing during this photoshoot, as much as I was sweating. (Gotta love that Florida heat.) Not only was I incredibly nervous, I simply cannot believe my little, baby, brother is graduating college! I was 6 when he was born, so I can remember his whole life vividly. There is no way he is about to be 21, and going to be called Mr. by his students! 

Leave a comment below if you refuse to acknowledge your younger siblings are getting older! ('cause that means you're getting older too!) I'd love to hear from my fellow bloggers about your confidence in your photography skills. Taking a picture of a product is so much easier than people right!? 

Sobbing As I Took My Baby Brother's Graduation Photos...

Wednesday, May 3, 2017

My dad and my sister made it really clear they thought this was a really weird thing to do, but I really wanted to retake our wedding photos! We got married 6 years ago, and we hired a friend of the family photographer to take our wedding pictures. He did a good job documenting the day. But, there were maybe 2 or 3 portraits of Blake and I that I actually loved. Most of them were really awkwardly posed or photoshopped to death. 

So it may have been a weird thing to do, but I'm so so happy we did it! Chabeli has taken our family photos before and did an amazing job once again with these pictures. I wore my original dress, but had to do my hair a bit differently because it's much shorter now. Blake on the other hand had a completely different outfit on. On our wedding day he wore a rather ill fitting tux, but now he's in his trusty navy suit. Our friend Tammy made us a bouquet and boutonniere. I did my own makeup and my sister did my hair! I only wish I did my own makeup on our wedding day-I may have actually looked like myself! 


So it was really super hard for me not to post every single picture! I love them all. The hardest part will be deciding which ones to get prints of! You can see more of our pictures here or here.

Me: 
Dress by David's Bridal (I'm pretty sure it's one of their $99 ones now! A little upsetting since it was a lot more than that in 2010) 
Pearls: Helzberg (A gift from Blake)
Hair Comb: Amazon

Blake: 
Suit by Men's Warehouse
Tie: J Crew
Pocket Square: Mark and Graham 
Shoes: Jos A Bank
Star Wars Cufflinks: Ebay

Leave me a comment: What do you think of retaking wedding pictures? What do you think of ours?

We Re-took Our Wedding Photos

Tuesday, April 12, 2016

My friend and I were flipping through a few listings on Realtor.com trying to find a place to fit her needs. Admittedly, I'm super nosey, so I LOVE looking at other people's houses. It's fascinating to me. Looking at houses with her was really fun, but man, I was having such a hard time looking at some of those listings. Why? The majority of the photos were horribly, terribly bad. Just one example was a shot of a living room, complete with a very elderly couple staring straight into the camera. Not kidding!

Like a chiropractor looking at someone with poor posture, or Stacy and Clinton looking at someone in a terrible outfit I could not contain my irritation! I've worked in a Real Estate office for the last ten years, and my absolute favorite part of my job is getting to take listing photos and making flyers to advertise homes. It's so fun and I get to be a little bit creative in my desk job. 

Some Realtors will hire a photographer for their listings. You'll see that a lot in bigger cities and in higher price ranges. But, working in a Real Estate office, I've seen my fair share of bad pictures. Many Agents take the pictures themselves, and sometimes even with their cell phones. Bad photos can mislead and can make your home unappealing to a potential buyer. They could love your house in person, but the pictures could stop them from even asking to see it. (Of course, some Realtors or Agents may be extremely talented at taking pictures! You can always ask to see examples of their other Listings to find out.)

My photography skills are limited and what I know I've picked up along the way. Mostly from blogging! Hiring a professional is truly your best option, and I think it's totally worth the initial investment. If that's not in your budget, here are a few tips to help you take your own listing pictures. I have a Canon Rebel T3, but these tips will work with your point and shoot!


Staging
I could do, and maybe will do, an entire post on staging. Your Realtor will give you some great tips on how to improve your curb appeal and what needs touch up paint. Give your house a good cleaning before you take your pictures. Use Windex to shine up your fixtures and put everything away (under the bed or in the car!). Declutter the best you can. Clear off surfaces, if not completely, to the minimum. Close drawers and toilet seat lids. Park your car somewhere else and close the garage door. You want people to look at your house, not your stuff. 

You know that elderly couple I mentioned before? In the photo of their bedroom you could see stacks of adult diapers and extra oxygen tanks. (Poor people!) It completely distracted us from looking at the room. You don't have to remove all of your personal items or even your photos. In fact some people want to know who lives in the house! But, the fewer personal items the more the room stands out.

Here is an example of a nicely staged Dining room. It isn't completely bare, but the family removed a lot of what was originally in the room. They took out a dog crate, bowls and a garbage can which left the room looking functional and open. 


Lighting
Turn on every light in your house! Open up all the blinds and curtains too. Light can completely transform a room. When you are shooting straight at a window, you will probably need to adjust your camera settings or slightly close the blinds to avoid a white out like in the picture above. (or take your photos early in the day when the light isn't as bright) Don't take your photos at night!
I also use this camera light in darker rooms to help brighten them up. 

Here is an example of turning on all the lights. This house was on a very shaded property, and with only a few windows. Turning on every single light really helped highlight otherwise darker rooms.


Angles
This is where you get to experiment. The angle at which you take your photo is crucial. You need to convey how large the room is and sometimes make it appear larger than it actually is. The best way to do this is to stand in the doorway, which will give you the largest and most complete view of the room. Each room may need to be photographed differently. 
For example:
I wish I could show you how deep I was in the corner of this room! I was as far back as I could go and even held the camera back behind my ear! Shooting with the camera horizontal will help you when it comes capturing as much of the room as possible (when a wide angle lens isn't an option for you.).


You will want to shoot vertically to highlight ceiling height or a small bathroom. I have a horizontal angle of this entryway to show how it connects to the next room, but I wanted to be sure that potential buyers could see the great vaulted ceilings, so I shot vertically as well.

Height
At 5'6'' I'm not exactly short, but sometimes you do yourself a disservice when you take pictures at eye level. Here are two examples of photos I've taken standing on a step ladder. In the bathroom I wanted to showcase the gorgeous sink and tile (that toilet paper really bothers me now though!) and in the dining room I really wanted to show off the openness. Shooting at eye level is fine, but getting a little higher can really help showcase features your house. 


You may need to squat down lower too! In the following pictures I got really low to the ground to show off the details of these bathrooms. 


General Tips
- Take several pictures at many different angles. The more pictures you take, the more you'll have to choose from. 

- Highlight your home's features. If you have gorgeous hardwood floors, make sure you can see them in your pictures! One house we listed last year had some amazing mature citrus trees in the backyard. It wasn't granite countertops, or stainless appliances, but a selling feature for sure!


- Watch for your reflection! Shooting a bathroom with a large mirror can be challenging, but if I see you in the picture I'm not looking at the room. 

- Cloudy days make for great photos of your home's exterior! It's awesome bright lighting, without the sun's glare or shadows.


- Give a room context. Don't shoot pictures of blank walls. The person will have no idea what they are looking at, or where it is in your home. If two rooms connect, let that reflect in the photos. Show how your floor plan flows. This is where taking several pictures of a room at different angles comes in.

- When taking pictures of your home's exterior, fill the frame with your house. While taking a picture from the street is important, your featured photo should be the actual house. Try shooting it at an angle instead of straight on to show the depth.

 Versus:

I hope my tips helped you! You do not need to be a professional to take good pictures. Spend a lot of time experimenting and trying different angles. The more photos you take, the more options you'll have to choose from!

Leave me a comment: Have you seen bad Listing pictures? What is the one thing that makes you cringe because of your job? Are you as nosey as I am when it comes to seeing what is inside people's houses?



How To Take Your Own Listing Photos

Wednesday, March 2, 2016


Hello!

Hi friends! I'm Kristen, and this is the Life and Style of a mid 30's Floridian living the Best Life Ever, with her husband and two pugs. Runner | Avid Reader | Small Shop Owner